Firebase에서의 on the fly 방식 썸네일 이미지 최적화(Hosting, Cloud functions)
Firebase에서 Hosting과 Cloud Functions를 활용하여 On the fly 방식으로 썸네일 이미지를 최적화하는 방법에 대해 알아봅니다.
이미지 최적화가 필요한 이유
- 이미지(스토리지) 대역폭을 줄여 자원 절약
- 브라우저에서의 빠른 렌더링을 통한 사용자 경험 향상
이미지 최적화를 위한 방법
기존 방법
파이어베이스에서는 이미지 리사이즈를 위한 익스텐션을 지원합니다(https://extensions.dev/extensions/firebase/storage-resize-images)
해당 익스텐션은 아래와 같은 방법을 통해 리사이징을 수행합니다
- 버킷에 파일이 업로드되면 해당 파일이 이미지인지 확인하고, 이미지인 경우 다음을 수행합니다
- 지정된 크기로 리사이징한 이미지를 생성합니다
- 원본 이미지의 이름에서 특정 접미사를 추가한 이미지 이름으로 이미지 이름을 지정합니다
- 원본 이미지와 동일한 위치 옆에 이미지를 저장합니다
이 익스텐션은 간단한 설정만으로 이미지 최적화를 수행하지만, 몇 가지 단점도 존재합니다.
- 리사이징된 이미지가 버킷에 함께 저장됩니다. 즉 동일한 이미지에 대해서 여러 크기 별로 이미지가 생기게 되고 스토리지 용량 증가와 함께 관리해야 할 파일이 늘어납니다
- 원하는 크기를 그때 그때 다르게 하기 어렵습니다. 확장 프로그램 구성에서 원하는 크기를 지정할 수 있지만, 갑자기 300x300의 이미지가 필요하다면 직접 수동으로 설정해야 합니다.

사용할 방법- on the fly
이미지를 최적화하는 다른 방법도 있습니다. 일반적으로 많이 사용하는 이 방법은 CDN과 캐싱을 사용합니다. CDN은 컨텐츠 전송 네크워크로 원본 서버보다 최종 사용자와 더 가까이 위치하여 빠르게 컨텐츠를 제공할 수 있습니다.
On The Fly라고 불리는 이 방식은 온디맨드 방식으로 사용자가 url을 통해 이미지의 주소와 크기 등을 보내면 서버에서 이를 처리하고 이미지를 전달하게 됩니다. 한번 처리된 이미지는 CDN에서 관리되므로 처음 요청할 때는 이미지 처리로 인해 속도가 느리지만, 두 번째 요청부터는 별도의 처리 없이 빠른 속도로 이미지를 제공할 수 있습니다
이미지 최적화를 위해 대표적으로 사용되는 CDN 서비스는 Cloudinary, aws cloudfront 등이 있습니다. 여기서는 파이어베이스의 호스팅을 통해 CDN을 사용하고, Cloud Functions 기능을 사용하여 서버리스 리사이징 기능을 구현합니다
❗이 방식을 사용하기 위해서는 Blaze 요금제를 사용해야 합니다. Blaze 요금제를 사용하더라도 무료 한도 내에서는 과금이 발생하지 않습니다.
파이어베이스 세팅하기
호스팅을 시작하는 기본 방법은 https://firebase.google.com/docs/hosting/quickstart?hl=ko에 소개 되어 있습니다.
npm install -g firebase-toolsfirebase init hosting
firebase init functionsfunctions까지 설치하면 아래와 같은 디렉터리 구조를 가지게 됩니다.

이미지 리사이징 함수 작성하기
functions 폴더에서 이미지 처리를 위한 라이브러리를 설치합니다
npm i sharpfunctions/src/index.ts파일을 아래와 같이 수정합니다
import { Request, onRequest } from "firebase-functions/v2/https";
import * as sharp from "sharp";
import { initializeApp } from "firebase-admin/app";
import { getStorage } from "firebase-admin/storage";
import { File } from "@google-cloud/storage";

/**
 * Represents an HTTP error with a specific status code.
 */
class HTTPError extends Error {
  /**
   * Creates a new instance of the HTTPError class.
   * @param {number} status The HTTP status code of the error.
   * @param {string} message The error message.
   */
  constructor(public status: number, message: string) {
    super(message);
  }
}

const SHARP_FORMATS = ["jpeg", "png", "webp", "jpg"];
const MAX_WIDTH = 2000;
const MAX_HEIGHT = 2000;

initializeApp();
const bucket = getStorage().bucket();

const validateUrl = (request: Request) => {
  const { query, params } = request;
  const { 0: urlParam } = params;
  const width = Number(query.width);
  const height = Number(query.height);
  const filePath = urlParam.replace(/^\/+/, "");

  if (isNaN(width) || width < 1 || width > MAX_WIDTH) {
    throw new HTTPError(400, "Invalid width");
  }

  if (isNaN(height) || height < 1 || height > MAX_HEIGHT) {
    throw new HTTPError(400, "Invalid height");
  }

  if (!filePath) {
    throw new HTTPError(400, "Invalid file path");
  }

  return { filePath, width, height };
};

const validateImage = async (filePath: string) => {
  const fileRef = bucket.file(filePath);
  const [fileExists] = await fileRef.exists();

  if (!fileExists) {
    throw new HTTPError(404, `Not Found - ${filePath} not found`);
  }

  const { contentType } = fileRef.metadata;

  if (!contentType) {
    throw new HTTPError(400, "Bad Request - Invalid content type");
  }

  const format = SHARP_FORMATS.find((format) => contentType.includes(format));

  if (!format) {
    throw new HTTPError(400, "Bad Request - Invalid image format");
  }

  return { fileRef, format };
};

const resizeImage = ({ fileRef, width, height }:{
  fileRef: File,
  width:number,
  height:number
}) => {
  const pipeline = sharp();
  fileRef.createReadStream().pipe(pipeline);
  return pipeline.resize({ width, height }).toFormat("webp");
};

const parseErrorMessage = (error: unknown) => {
  if (error instanceof HTTPError) {
    return { status: error.status, message: error.message };
  }

  return { status: 500, message: "Internal Server Error" };
};

export const images = onRequest(async (request, response) => {
  try {
    const { filePath, width, height } = validateUrl(request);
    const { fileRef } = await validateImage(filePath);

    response.setHeader("Content-Type", "image/webp");
    response.setHeader("Cache-Control", "public, max-age=31536000");

    resizeImage({ fileRef, width, height }).pipe(response);
  } catch (error) {
    const { status, message } = parseErrorMessage(error);
    response.status(status).send(message);
  }
});
파이어베이스 배포하기
cloud functions를 http api로 배포하기 위해 firebase.json파일에서 경로를 연결해줍니다
source 경로로 들어오는 요청을 images 함수로 연결합니다
{
  "hosting": {
    "rewrites": [
      {
        "source": "/**",
        "function": {
          "functionId": "images",
          "region": "us-central1",
          "pinTag": true
        }
      }
    ],
    ...
  },
  ...
}
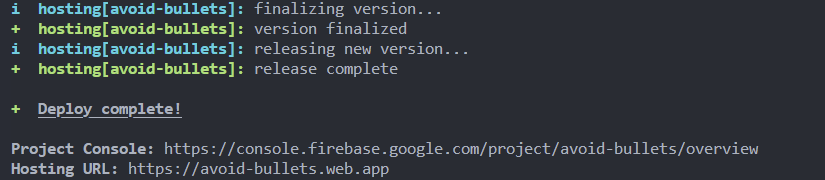
depoly 명령어를 사용하여 functions와 hosting을 배포합니다
firebase deploy --only "functions,hosting"배포가 완료되면 호스팅 URl을 볼 수 있고 <Hosting URL>/<버킷 내 이미지 경로>를 통해 접근할 수 있습니다
결과 확인
테스트를 위해 이미지를 업로드합니다.
CDN에서 해당 이미지를 사용하기 위한 경로는 https://avoid-bullets.web.app/test.jpg입니다
여기에 리사이징을 위한 width, height를 query string으로 붙여 줍니다
https://avoid-bullets.web.app/test.jpg?width=300&height=300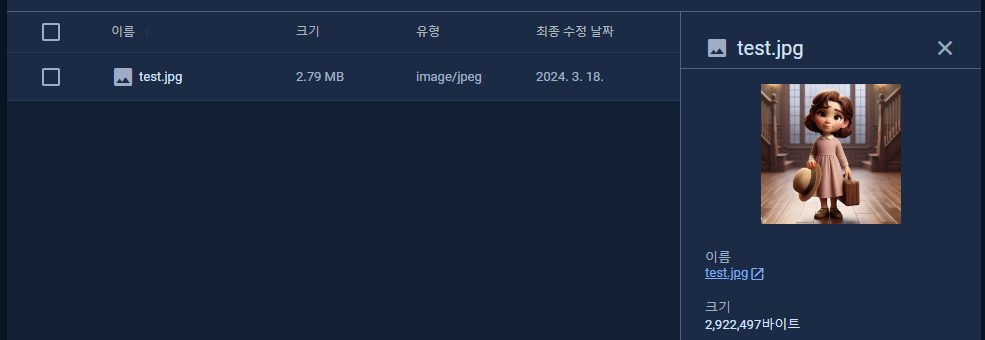
로딩 시간 비교
원본 이미지를 불러올 때

CDN에서 처음에 불러올 때 - Miss


CDN에서 캐싱된 후에 불러올 때 - Hit


임시 디렉터리에 저장된 이미지의 200x200 썸네일을 만든 후 다시 Cloud Storage에 업로드하는 방법
https://firebase.google.com/docs/functions/gcp-storage-events?hl=ko&gen=2nd
JPEG, PNG, WebP, GIF AVIF, TIFF 형식을 지원하는 확장
https://extensions.dev/extensions/firebase/storage-resize-images
'JAVASCRIPT' 카테고리의 다른 글
| Nextjs에서 tanstack-query Prefetch를 왜 해야 할까 (0) | 2024.04.22 |
|---|---|
| vitest에서 msw를 사용해 api mocking 시작하기 (0) | 2024.02.08 |
| nextjs tailwind pagination 컴포넌트 (usePagination) (0) | 2023.12.26 |
| nextjs middleware rewrite를 통해 서브 도메인 적용하기 (0) | 2023.11.26 |
| 항해 플러스 코육대 1회 총알 피하기가 아니라 추석 음식 피하기! 회고 (1) | 2023.10.03 |